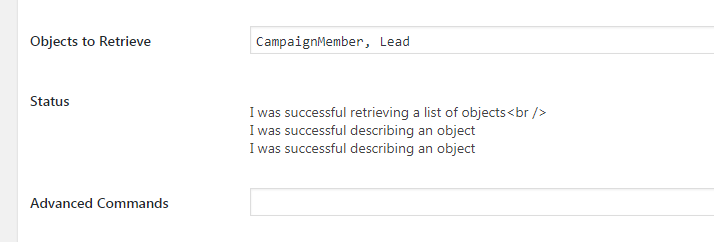
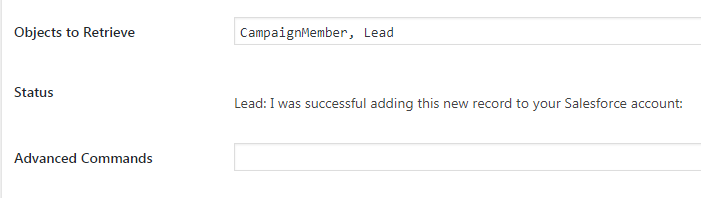
Wordpress CRM Integration

Connecting Wordpress to your CRM easily and effectively

  • Salesforce
  • Zoho CRM
  • Insightly
  • Capsule
  • About

Ninja Forms Salesforce Plugin


The Ninja Forms Salesforce extension enables you to create any new entry in your Salesforce account directly using Ninja Form's powerful and easy drag and drop form builder.

Leads, Contacts, Accounts, Campaigns, Opportunities, Cases, Notes, and Tasks are the most popular to create, but by no means an exhaustive list.

Browse the posts here to  get some insight, hints, and tutorials to help you get the most out of your Wordpress-to-Salesforce integration.

March 29, 2018 by Stuart Sequeira

Using a Test Environment in Salesforce

You have the ability to connect your Ninja Forms to a Salesforce test environment if you wish.  Here’s how

The Code

The following code can be added to your theme’s functions.php file, or another plugin file where you prefer to run code snippets.

The default access point for Salesforce is ‘login.salesforce.com’ so you don’t have to do anything if you are using the default. In my example, I am using a Salesforce environment accessed at test.salesforce.com.  If you are using something different, you can switch out ‘test’ with whatever subdomain you are using.

add_filter( 'nfsalesforcecrm_set_connection_type' , 'nf_change_salesforce_endpoint');

function nf_change_salesforce_endpoint(){

return 'test';
}


Filed Under: Salesforce

March 28, 2018 by Stuart Sequeira

Autoresponders for Salesforce

I received a support inquiry about how to add an autoresponder to a Salesforce submission.  While Salesforce’s REST API doesn’t directly allow triggering an autoresponder, Salesforce’s knowledge base has documented a way to accomplish the desired end result.

The solution is to “create a workflow rule that would fire on Lead/Case creation that would send an email to the correct address“.  The solution mentioned answers a specific question regarding Lead and Case creation but you may be able to create the work flow for any object.  If you do try it with a different object, I’d love to hear about it so I can share the experience with other Ninja Forms Salesforce users.

If you’d like to read the details, here is a link to the full knowledge article:

https://help.salesforce.com/articleView?id=000212166&type=1


Filed Under: Salesforce

March 19, 2018 by Stuart Sequeira

Adding Attachments to Custom Salesforce Objects

The Ninja Forms Salesforce plugin lets you add attachments automatically to Accounts and Contacts.  If, however, you have a custom object, it can’t automatically add it out of the box because I don’t know the name of your custom object that you want to use.  For that reason, I built in the ability for you to create your own link so that you can attach an uploaded file to your custom object.

How To Link an Attachment to a Custom Object

add_filter('nfsalesforcecrm_filter_child_object_array', 'lb3_attachment_to_custom_object');

function lb3_attachment_to_custom_object($default_child_object_array){

    $modified_array = $default_child_object_array;

        $modified_array[ 'my_custom_object_name']=array(
        'Attachment'=>'ParentId'
    );

    return $modified_array;
}

Note that in this example, you would replace my_custom_object_name with the name of your custom object as displayed in the Salesforce Object list in the Salesforce Settings of  your Ninja Forms Settings page.

Setting an Appropriate Object Order

Because we are taking the custom object we just created and putting its ID into the attachment object, we need to ensure that we create the custom object before trying to create the attachment.  This is accomplished by filtering the Salesforce Object Order to add our custom object in the appropriate order.  Attachments are created at sequence number ’50’ so a good order number for a custom object is ’15’.  See the snippet below.

 
add_filter('nfsalesforcecrm_filter_object_order', 'lb3_add_custom_object_order'); 
function lb3_add_custom_object_order($default_object_order){ 
    $modified_array = $default_object_order; 
    $modified_array[ 'my_custom_object_name']='15'; 
    return $modified_array; 
} 

How It Works

The objects in Salesforce are linked but adding the ID of the parent object as  a field in the child object.  For attachments, the field used is called ‘ParentId’.  The plugin has a configured array that contains an array of standard Salesforce objects, each of which has an array of child objects that holds the name of the field used for linking.  When one of the parent objects is created, the Ninja Forms Salesforce extension looks through this array and then adds the newly created ID into any available child objects using the specified field.

In our example, we add a new key called my_custom_object_name and specify that if an Attachment is also being created by the form submission, we want to to that the my_custom_object_name ID and add that as the ParentId field for the attachment, thus linking the two together.


As always, if you have any questions, please don’t hesitate to contact me.

Sincerely,


Stuart Sequeira


Filed Under: Salesforce

December 21, 2017 by Stuart Sequeira

WordPress to Salesforce Status Message

The best place to solve your WordPress to Salesforce connection challenges is your Ninja Forms Settings page Salesforce Section.  Here is a quick screen shot of what it looks like:

Screenshot of Salesforce Status display

Each line in the status is one step of the last communication and knowing that helps you read through it.

In this example, see that the plugin retrieved a list of Salesforce objects, then described an object twice.  I purposely chose this example because, as you see immediately above,  I had requested to retrieve two objects- CampaignMember and Lead.  From this, you can now surmise that the plugin connected to Salesforce, got a list of objects, and then described two of them.

Currently, the wording may seem strange to you and I’m working on that.  As I continuously improve the plugin, I am adding enhancements to improve readability.  For now, however, I will strive to document not only the responses from Salesforce, but what you can do about it.

Another Example

Here is another sample screenshot to get your comfortable reading them:

Screenshot of status message for successfully adding a lead to Salesforce from WordPress

Here, I created a form to add a Lead to Salesforce.  My status starts with “Lead:” which tells me the specific object I am sending.  Next, the details tell me I was successful adding it to Salesforce. – yay –

If you are creating multiple objects, like an Contact and an Account, they are listed in order created.  Be aware that the order you set up on the form may not be the order they appear here.  The plugin in sorts your form data to add things in the optimal way for adding them to Salesforce.

Going Forward

As you develop your forms, make this section the first place you look to solve issues.  I like to keep this page open on one tab and on my form design on another.  In doing so, I can quickly go back and forth, testing a new field then seeing how it worked.  Salesforce is powerful, and it has rules for data that keep it robust.  If your form didn’t get through to Salesforce, this page will tell you the rules to follow.  From there, you can adjust accordingly and finalize your WordPress Salesforce connection.

Filed Under: Salesforce Tagged With: Salesforce Tutorial

December 15, 2017 by Stuart Sequeira

About Salesforce Objects To Retrieve

Ninja Forms‘ Salesforce extension has a setting called “Objects to Retrieve” that is designed to speed up your form building experience.  Here’s how it works and why.

A Little Background

During setup, the plugin sends a request to your Salesforce account to retrieve all the objects that you have available for sending data to, including not only standard objects, but also any custom ones that you have created.  Here’s a list of the available objects from a typical Salesforce account:

Screenshot of Salesforce's available objects

Each of these objects have fields in which the information is stored.  For example, the Lead object has fields like “First Name”, “Last Name”, etc.  Here’s a screen shot of the all the fields available in the Lead object, including a few custom fields I created:

Screenshot of Salesforce's Lead fields


The Challenge

So now try to imagine how many total fields there are available in Salesforce.  Then picture yourself sorting through all these fields  to find the right ones you are using for your specific form.  This situation is what the ‘Objects To Retrieve’ setting is designed to address.

The Solution

In the Objects To Retrieve text box, type in only the objects you plan to create. This limits the list of field mapping options to only those that you will actually be using.

For example, if you built a form to capture Leads  associated Campaign, your Objects To Retrieve setting should look like this:

Screenshot of Salesforce Lead and CampaignMember setting

Voila! Your list of fields is reduced to a very manageable collection.

If you have any questions about this, or regarding integrating WordPress and Ninja Forms with your Salesforce account, just ask.

Filed Under: Salesforce

  • 1
  • 2
  • Next Page »

Recent Posts

  • Using a Test Environment in Salesforce
  • Autoresponders for Salesforce
  • Connecting to Zoho’s EU Endpoint
  • Adding Attachments to Custom Salesforce Objects
  • WordPress to Salesforce Status Message

Maintained By:

Stuart is the author of several CRM integration plugins for Wordpress using Ninja Forms. He also writes custom integrations that cater to the unique sales and marketing needs of his clients.

Copyright © 2023 · Generate Pro Theme on Genesis Framework · WordPress · Log in