Wordpress CRM Integration

Connecting Wordpress to your CRM easily and effectively

  • Salesforce
  • Zoho CRM
  • Insightly
  • Capsule
  • About

Ninja Forms Zoho CRM Plugin for Wordpress

The Ninja Forms Zoho CRM extension enables you to create any new Lead, Account, Contact, Potential, Task, and Note in your Zoho CRM account directly using Ninja Form's powerful and easy drag and drop form builder.

Browse the posts here to  get some insight, hints, and tutorials to help you get the most out of your Wordpress-to-Zoho CRM integration.

March 20, 2018 by Stuart Sequeira

Connecting to Zoho’s EU Endpoint

If your Zoho CRM account is on their EU endpoint, you can connect your Ninja Forms’ Zoho CRM plugin with one additional setting.

In the Zoho CRM settings section of the Ninja Forms Settings page, go to the Advanced Commands section and add this code:

eu_endpoint

If you have other advanced commands, be sure to separate them with a comma.   After you save your options, click the “Click to Test Your Zoho Connection” link and you should now be connected using Zoho’s EU endpoint.

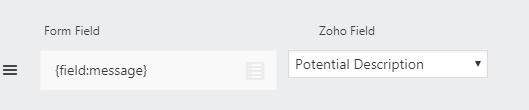
Here’s a screenshot to help you:

Advanced Command setting for using Zoho's EU endpointSincerely,


Stuart Sequeira


Filed Under: Zoho CRM Tagged With: Advanced Commands

December 20, 2017 by Stuart Sequeira

Create A Zoho CRM Potential Through WordPress

Ninja Forms‘ Zoho CRM plugin for WordPress lets you easily create a Potential using your form.  Here is an explanation of how you can quickly implement this into your sales process.

Your Form

When building your form, consider who will fill in the values you want to send for each field.  In many cases, you, the form designer will set the values.  This is quite different from contact information, which is exclusively the realm of the site visitor.   Perhaps it is easiest to think of the Potential form as a Request for Quote, where the customer fills out some fields, and some areas are reserved “For Office Use Only.”

Considering this first saves you time since you only need to add form fields for the information that comes from the site visitor.

Mapping Your Fields

For any given field, if you want the site visitor to supply the value, add the form field value using Ninja Forms’ awesome Merge Tag feature.  For example, I want a paragraph field on my form for the visitor to describe what they want.  I map that paragraph field to Zoho’s Potential Description field, which is designed to handle paragraph text.

Field Map Paragraph Field for Zoho Potential Description

If, however, you want to set a Potential field yourself, you can simply put the value directly in the form field.  In this example, I want to set the Stage of all form submissions to “Needs Analysis.”

Screenshot of how to manually set a field map value

Match Your Zoho Field Types

It is important for you to know the field types for each Zoho Potential field.  If you send an incorrect value, Zoho will reject your request and not create the Potential.  Luckily, Ninja Forms makes it easy to control with its drag and drop feature for fields and field maps.  Here is a list of Zoho field types and how best to map them from your Ninja Forms.  Of course, with any of these types, you can manually set the value so long as you follow the rules for that field type.

Text Box

A text box in Zoho is a single line entry, usually with some character limit, like 120 characters.  Use a Ninja Forms text box for open-ended responses or a multi-select field to limit choices.

use for: Name, Next Step

Text Area

Text areas are paragraph entries.  Ninja Forms’ text area field is perfect for this.

use for: Description

Pick List

Perhaps the most troublesome field type to map, Pick Lists require that the value sent matches a value in your CRM settings.  Your best bet is to use a pick list to limit choices to valid ones.

use for: Type, Lead Source, Stage

Lookup

The secondmost troublesome field type to map, Lookups require that the value sent matches an entry in your CRM account.  Campaign Source is a perfect example.  You can create a new campaign source and then use its value on your form.  Just be sure that if you delete the entry in Zoho, you change the value on your form also.

use for: Campaign Source

Currency

Use a text box and add a currency mask to ensure that the value sent matches the currency requirement of your Zoho account.

use for: Amount, Expected Revenue

Number

Usually an integer, this is best suited for either a Ninja Forms Number field, or a text box with a mask to limit it to numbers.

use for: Probability

Date

This requires a date value in Zoho’s format – ‘m/d/Y’.  Ninja Forms’ date field works perfectly for this.  Also, you can also choose to specify a date interval.  This lets you set a date in the future counted out from the time of form submission.  For example, set the close date to ‘3 weeks’ if you expect to close the potential within three weeks from the time the user submits the form.  Typical values include  __ days, __ weeks, __ months, __ years

use for: Closing Date

Conclusion

When you know the Zoho field types and which Ninja Forms field to use for each, you can master Potentials creation.  After that, you can easily focus on building the best form that attracts customers and get them immediately into your Potentials pipeline.

As always, if you have questions or comments about connecting WordPress to your Zoho account, just contact me.

Filed Under: Zoho CRM

December 16, 2017 by Stuart Sequeira

Triggering Zoho CRM Workflows through WordPress

If you use Workflows in your Zoho CRM, you can trigger those automatically when creating a new entry using Ninja Forms‘ Zoho CRM extension.

Quick Instructions

  1. Start from the Ninja Forms menu in your WordPress dashboard and edit the form you wish to use.
  2. In your field mapping options, set a value of ‘true’ (no quote marks) and map this to the Trigger Workflows field map.

Screenshot for Setting Zoho CRM Workflow Trigger

Now, when the form creates a new entry (Lead, Contact, Account, etc.), the plugin will automatically trigger any workflows associated with the creation of these.


Filed Under: Zoho CRM

May 16, 2015 by Stuart Sequeira

Setting a Date Field Format Ninja Forms to Zoho CRM

When setting a date field to import into Zoho CRM, you must ensure that the date format on your form matches the date format in Zoho.

First, you can check your Zoho CRM date format by adding a date to your Zoho field and see the format it requires.

Screenshot of date as formatted in Zoho CRM

You will now need to match this date format on your Ninja Form. Go to the Forms Settings page and type in the matching format in the Date Format field.

Screen shot of date settings in Ninja Forms Settings page

When the format in this field matches your Zoho CRM correctly, you will be able to send date information directly into this field. You can verify that the date format send correctly by viewing the raw request sent to Zoho; note how the “Date” field has the correct format.

Screenshot of raw request sent to Zoho highlighting the date field

Filed Under: Zoho CRM

January 20, 2014 by Stuart Sequeira

Zoho CRM Form Plugin for WordPress

Zoho CRM LogoI recently wrote a plugin so you can create your own custom Zoho Lead forms  for your WordPress website along with data validation and email notifications.  Using the awesome Ninja Forms plugin as a base,  you can build a contact form and point each field to a field inside your Zoho CRM Leads module.  That’s all there is to it!

Custom fields are supported so if you have custom fields you created in Zoho, you’ll be able to collect form data for those as well.  Built-in features include automatic data collection for user names, email, and URL of the submitting page.  If you want to learn about users’ browsers and location, consider combining this plugin with the User Analytics plugin to get brower info, IP address, ZIP code, and more.

Zoho has a built-in form generator but it has its limitations.  It doesn’t have much data validation, drop-down selectors, input masks – the things that help guide your site visitors to fill out your form with the info you need.  You can’t get automatic email notifications when someone fills out the form so if you don’t log into Zoho everyday, you can risk critical delays in following up with those leads.  These problems are all easily solved with the Zoho CRM plugin for WordPress.  Drag-and-drop fields enable you to easily populate your form.  Default values pre-fill in fields with user names, email, and the URL of your web page.  You can add masking so fields like phones and ZIP Codes stay consistent.  Don’t limit yourself to one pre-built form.  This Zoho CRM WordPress plugin will simplify your web forms and let you spend time on making more sales.

Download the premium  Zoho CRM WordPress plugin and make your website-to-lead generation so much simpler!

Filed Under: Zoho CRM

Recent Posts

  • Using a Test Environment in Salesforce
  • Autoresponders for Salesforce
  • Connecting to Zoho’s EU Endpoint
  • Adding Attachments to Custom Salesforce Objects
  • WordPress to Salesforce Status Message

Maintained By:

Stuart is the author of several CRM integration plugins for Wordpress using Ninja Forms. He also writes custom integrations that cater to the unique sales and marketing needs of his clients.

Copyright © 2023 · Generate Pro Theme on Genesis Framework · WordPress · Log in